PygameZero中文文档 - 2
本篇介绍了FlappyBird的PygameZero实现,为了方便与Scratch比较,所以没有加入计分功能。
舞台
在Scratch舞台区的内容大概是这样的:
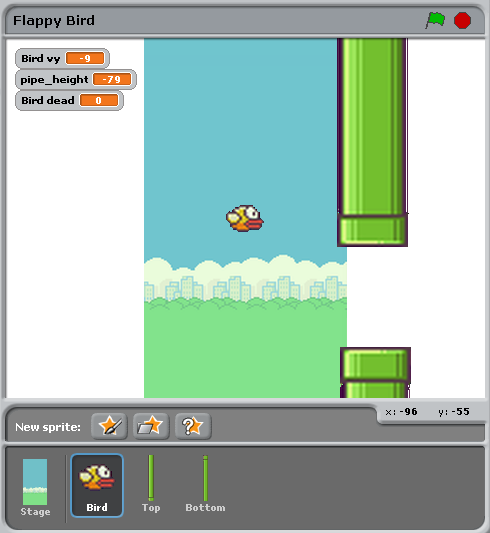
除了舞台背景之外,还有三个对象:小鸟,上方管道和下方管道,对应的Pygame Zero代码是把这些对象都设置为 Actors :
1 | bird = Actor('bird1', (75, 200)) |
在Pygame Zero中,我们还必须保证绘制这些对象。原则上,这为绘制场景提供了一些灵活性:
1 | def draw(): |
管道移动
不管小鸟如何,管道都以恒定的速度移动。当它们离开屏幕的左侧时,会向右环绕,并且他们的垂直位置是随机的。
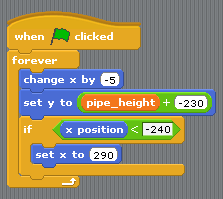
在Scratch中,可以通过为上方管道和下方管道创建两个不同脚本来实现。
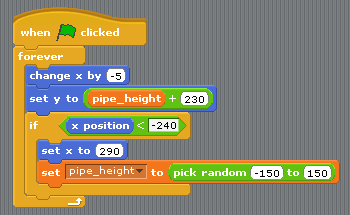
总结一下这里都干了啥:
- 当管道离开屏幕的左侧时,条件
x position < -240为真,这将会重置管道。 - 变量
pipe_height用于改变管道在竖直方向上的位置。因为它们之间空隙高度应保持不变,我们无法随机两个高度。因此,我们只在其中一个脚本设置了pipe_height随机的逻辑,而另一个脚本则没有这个逻辑。 - 脚本
set y position to pipe height +/- 230让上方的管道在pipe_height之上,让下方管道在pipe_height之下。
在Pygame Zero中代码就简单多了。我们可以定义一个函数不停的更新两个管道。当然我把更新管道的过程分成了两部分,这样管道重置的过程就更加清晰:
1 | import random |
与Scratch一个小小的不同,是我可以把需要复用的值定义为“常量”,用大写字母表示。当我需要调整游戏时,我只需要修改一次值就好了。比如在上面的例子中,当我需要增大或者减小空隙高度的时候,我只需要简单的修改 GAP 的值就可以了。
与Scratch代码最大的不同在于,Python代码中没有 forever 循环。这是Scratch和大多数基于文本的编程语言的区别:你必须通过重复的更新一小步动画的方式来更新游戏。重复的过程让Pygame Zero有机会处理输入或者刷新屏幕。如此循环往复就会形成游戏了,所以任何循环都必须快速完成。
当你需要更新一步动画的时候,Pygame Zero会调用 update() 函数,所以我们只需要调用一次 update_walls
1 | def update(): |
小鸟
上面介绍的如何把Scratch逻辑转换为Python代码的模式,同样适用于小鸟的逻辑。我们首先来看 一下Python代码。
用来更新小鸟相关的代码被整合到了一个叫做update_bird 的函数中。
根据重力移动小鸟
这段代码包含的第一部分,是根据重力移动小鸟的相关代码:
1 | GRAVITY = 0.3 |
这是一个很简单的重力公式:
- GRAVITY 指的是 重力加速度
- 加速度是指速度的改变
- 速度代表小鸟的位置的改变
因此我们需要追踪一个 bird.vy 变量,表示小鸟在 y 方向的速度。这是我们新定义的一个变量,而不是Pygame Zero提供的。
- GRAVITY 指的是 重力加速度 :
GRAVITY大于0 - 加速度是指速度的改变:把
GRAVITY加到bird.vy - 速度代表小鸟的位置的改变: 把
bird.vy加到bird.y上
注意!小鸟水平方向的位置是始终不变的,整个游戏中小鸟的 x 坐标始终是 75。我们通过让管道移向小鸟来模拟小鸟的运动。这看起来就像是一个移动的镜头在跟随着小鸟,所以游戏中并不需要 vx 变量。
让小鸟拍打翅膀
接下来的部分是让小鸟可以拍打翅膀:
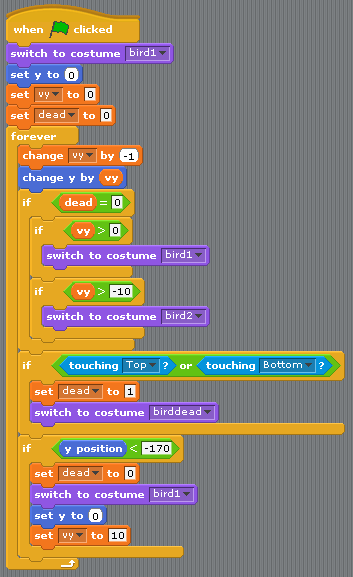
1 | if not bird.dead: |
这会检查小鸟是向上移动还是向下移动。如果小鸟向上移动我们设置图片为 bird2 ,否则设置图片为bird1 。(-3是通过不断试错得出的经验值,这样游戏看起来会更加真实。)


检测小鸟是否撞管子
接下来我们要检测小鸟有没有撞管子。
1 | if bird.colliderect(pipe_top) or bird.colliderect(pipe_bottom): |

如果小鸟撞到管子了,我们就把变量 bird.dead 值设置为 True。这是一个布尔值表示非假即真,这样我们可以方便的检测小鸟是否还活着。如果小鸟挂了,我们就不需要响应玩家的输入了。
检测小鸟是否触顶/触底
最后我们检测一下小鸟有没有触底或触顶(屏幕的上下边缘),如果是的话就重置小鸟的状态和属性:
1 | if not 0 < bird.y < 720: |
重置小鸟,为什么要调用 reset_pipes() 呢?是因为我们把管道代码定义成一个独立的函数,所以每当我们想重置游戏时都可以调用它。这样,小鸟回到初始位置时会让玩家有一段反应的时间,这样才是一个友好的游戏。
放在update()函数中
再次重申,以上过程的每一帧都要调用,因此我们把这些操作放到 update_date() 函数:
1 | def update(): |
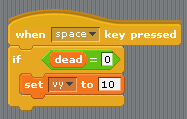
响应玩家输入控制
小鸟逻辑的最后一部分是必须响应玩家控制。当我们按键时要让小鸟向上飞。当你按了键盘上的任何一个按键,Pygame Zero都会调用 on_key_down 函数(需要先定义):
1 | FLAP_VELOCITY = -6.5 |
这里,如果小鸟没挂的话,我们设置小鸟的 vy 为一个负数:在Pygame Zero中,意味着小鸟在向上移动。
无论Scratch还是Python代码,你都能够找到许多相似之处:
Scratch和Pygame Zero最大的区别在于:
- 在Pygame Zero中你不能无限循环,只能更新每一帧并然后重复
- 坐标系不同。Pygame Zero中屏幕的左上角是原点
x = 0, y = 0,x轴正方向跟Scratch一样是从左向右的,但是y轴指向屏幕下方!这也是 为什么GRAVITY是正数而FLAP_VELOCITY是负数了。 bird.dead是一个布尔值,所以我们可以写if not bird.dead而不是像Scratch一样写dead = 0。
总结
许多Scratch种的概念可以直接迁移到Pygame Zero中。
下面是一些对比:
| In Scratch | In Pygame Zero |
|---|---|
change y by 1 (上) |
bird.y -= 1 |
change y by -1 (下) |
bird.y += 1 |
set costume to <name> |
bird.image = 'name' |
if dead = 0 |
if not bird.dead: |
set dead to 0 |
bird.dead = False |
if touching Top? |
if bird.colliderect(pipe_top) |
When Flag clicked… forever |
把代码放入update()函数中 |
When [any] key pressed |
def on_key_down(): |
pick random a to b |
import random to load the random module, then random.randint(a, b) |
| (0, 0) 是舞台中心 | (0, 0) 是窗口左上角 |
在某些情况下,Python中的代码更简单,因为Python的代码可以组织成更易于阅读的方式。
Pygame Zero中的角色也让我们更加简单的使用坐标。我们使用 anchor 位置来定位管道,我们通过检测管道的 pipe_top.right < 0 而不是 if x position < -240 来判断管道是否离开了屏幕。
全部代码
1 | # flappybird.py |
小提示:导入
pgzrun后,调用pgzrun.go()可以直接运行程序,而不需要在命令行中使用命令pgzrun flappybird.py。
- 标题: PygameZero中文文档 - 2
- 作者: Ward
- 创建于 : 2019-08-28 11:09:15
- 更新于 : 2020-11-24 23:36:25
- 链接: https://wangjiaxi.github.io/2019/08/28/PygameZero中文文档 - 2/
- 版权声明: 本文章采用 CC BY-NC-SA 4.0 进行许可。